Making Textures
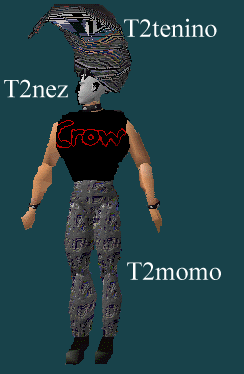
This package is the perfect package for making textures.
Download the package from the picture opposite it is a zip file so
you will be able to save it into whichever folder you wish.
Once downloaded you will be able to make .mov files these files
can be used in Worlds3d to make textures for either your worlds
or for your Avatars.
In the package it tells you not to make images larger than 200 in
size these will be too big for Worlds as they only except the size 128
make sure that if you want invisible parts on your image, have the
top left hand corner of the image same colour as the invisible parts
on your finished work.
Once you have made your .bmp image (s) save them into same folder
as the package you have just downloaded make sure you save your
.bmp's with the first letter being a capital . The package is called
Athena, click begin on Athena, then go onto add the image you made
in a .bmp file(s) will shown in the box, with the invisible colour below
picture click on ok. You will have to add more than one image to the
list to make this package work. Add more than one picture to the list
in any one time by clicking on add.
Next go to Next Step then Next Step again, then in Avatar Name use
the name of the first .bmp you started with making sure it starts with a
capital letter. Then click on Prepare, next click on Next. This will take
you to the window with Create Avatar! button in it click on this.
Your computer will now go into Dos mode to sort out the files and
change them (Don't worry). Once the package has finished making
the .bmp's into the right format you can close the Dos window and at
the side of Create Avatar! button you should see CMP created: TRUE
and MOV created: TRUE. The textures we want for the Avatars are
the .mov ones. Close the package down by clicking on the X if you
click on finish and get an error message don't worry this is a fault in the
package not your work as long as the MOV file said true you are
doing well. Now look where your files have been saved and find the
file with the .mov ending right click on this file and chose copy, now
open your worlds folder and look for the folder called "avatars" right
click on this file so it is highlighted and chose paste.
Open your Worlds program and type into your Avatar string the letters
T2 before the name of your texture you have made example above.
I save one of my .bmp's with the name Nez and the package made
this into the nez.mov file and by typing T2nez it has given me the
required texture for my face, if you take a picture of your own face
and save you can put your own face on the Avatar but remember people
have to have the textures you have made in their avatar folder for them
to see them.

To download the package click on the picture of the Crow Avatar above.

Back.
|
|